
Contents5 sections
Level: Beginner. Time: about 15 minutes for your first backup. Cost: nothing — the free version of UpdraftPlus does everything in this tutorial.
1. The update nobody clicked
On 12 October 2024, owners of sites running a very popular plugin called Advanced Custom Fields woke up to something strange. An automatic update had quietly swapped their plugin for a different one, called Secure Custom Fields. Nobody had clicked anything. Nobody had agreed to the swap. It just arrived, the way automatic updates do.
The swap itself was small. But some sites had custom code built on the old plugin, and that code broke — quietly. Pages went blank. Features stopped working. And the owners had a horrible problem: how do you undo an update that happened while you were asleep?
The answer, for the lucky ones, was a backup. A restore put the site back to exactly how it had been the day before. The unlucky ones spent their weekend digging through files, guessing, and paying people to guess faster.
That is what “no backup” actually costs. Not a dramatic Hollywood hack. Just an ordinary update, on an ordinary day, that you cannot take back.
Here is the good news: a backup takes about fifteen minutes to set up, and after that it mostly looks after itself. This tutorial is step zero. Do it before you touch anything else on your site — before the next update, before the next fix, before the next bright idea at midnight.
Nobody has ever said, “I wish I had backed up less.”
2. What you need
Three things. That is all.
- UpdraftPlus, the free version. A plugin is a small add-on program that gives WordPress a new ability — in this case, making backups. UpdraftPlus is the most widely used backup plugin in WordPress, running on more than 3 million sites. The free version does everything in this tutorial. You do not need the paid version, and this tutorial never asks you to buy anything.
- About 15 minutes. The first backup takes the longest. After that, backups run on their own.
- An off-site place for the copy. Off-site means somewhere that is not the same server your website lives on. If your server dies, a backup sitting on that same server dies with it. A free Google account gives you 15 GB of Google Drive storage, which is plenty for most small sites. A free Dropbox account works too. This tutorial uses Google Drive as the worked example, because the steps are the same idea either way.
One more thing, and it matters: keep UpdraftPlus itself updated, like every plugin on your site. This tutorial was checked against version 1.26.14, the current free version. And you do not need a service called UpdraftCentral for any of this — that is a separate remote-control dashboard for managing many sites at once. If a screen ever offers to add your site to it, leave it switched off unless you specifically want that.
3. The steps
Step 1: Install and activate UpdraftPlus
- Log in to your WordPress dashboard. That is the control room behind your website — the screens you see after logging in at
yoursite.com/wp-admin. - In the left-hand menu, click Plugins, then Add New.
- In the search box at the top right, type
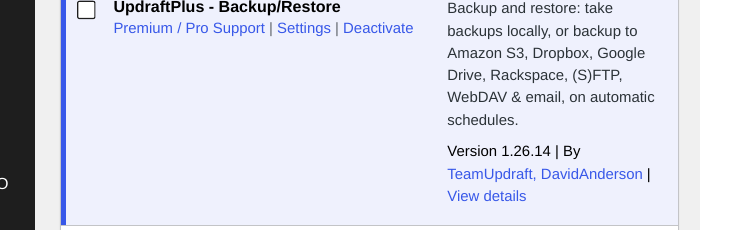
UpdraftPlus. - Find UpdraftPlus WordPress Backup & Migration Plugin in the results. Click Install Now next to it.
- When the button changes to Activate, click Activate.
That is it. UpdraftPlus is now running on your site.
Step 2: Run a FULL backup — files AND database
First, a quick explanation, because this is the part people get wrong.
Your website is two things, not one:
- The files. These are the physical ingredients: your theme (how the site looks), your plugins (what it can do), and your uploaded images and documents. Think of them as the kitchen.
- The database. This is a behind-the-scenes list where WordPress keeps all your words and settings: your posts, your pages, your comments, your shop orders, your menu layout. Think of it as the recipe book.
If you back up only the files, you keep the kitchen and lose every recipe. If you back up only the database, you keep the words and lose the look, the tools, and the photos. A backup is only a backup when it has both. Remember that sentence. It will save you one day.
Now, the backup itself:
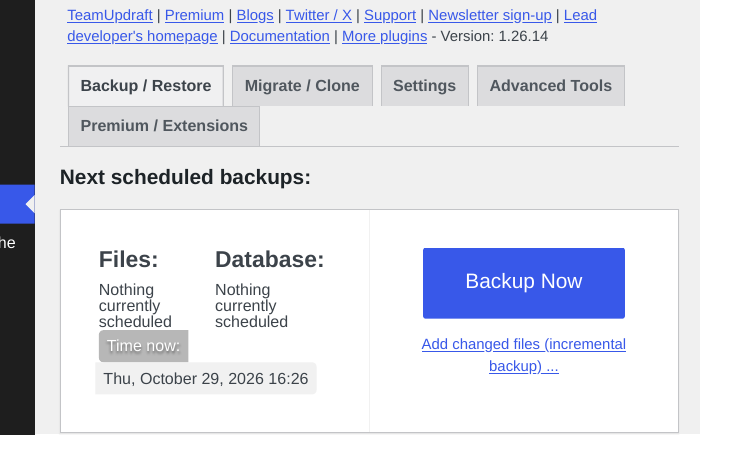
- In the left-hand menu, go to Settings, then click UpdraftPlus Backups. (On some setups, UpdraftPlus sits directly in the left-hand menu instead — same page, same tabs.)
- You will see tabs at the top. Click the Backup / Restore tab.
- Click the blue Backup Now button.
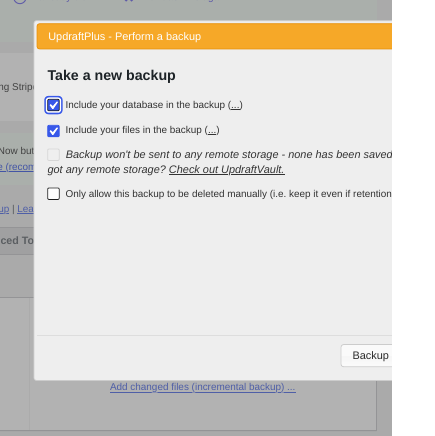
- A small window opens with tick-boxes. Leave everything ticked. That means the database and the files are both included — exactly what you want.
- If the window offers the option Send this backup to remote storage, make sure it is ticked too. (You will connect the remote storage in Step 3. If you have not connected it yet, run this first backup now anyway, then connect the storage and run it once more. A backup on the server beats no backup at all.)
- Click Backup Now again, in the window.
- UpdraftPlus shows a progress bar while it works. A small site takes a few minutes. A big site with years of photos takes longer. Let it finish. Do not close the tab mid-backup.
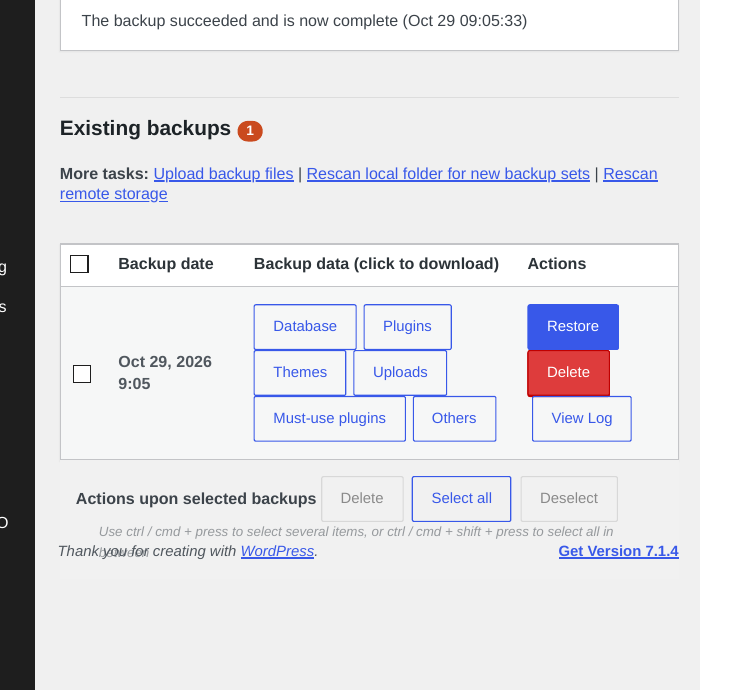
- When it finishes, your new backup appears in the Existing Backups section further down the page. You should see five parts listed: Database, Plugins, Themes, Uploads, and Others. All five means a full backup. If one is missing, run the backup again before you trust it.
Well done. You now have a way back. But it is sitting on the same server as your site, and that is only half the job.
Step 3: Send a copy OFF the server
This is the step that turns a backup into a safety net. A copy on Google Drive survives anything that happens to your server — a crash, a hack, a billing mistake, a bad day.
- In UpdraftPlus, click the Settings tab.
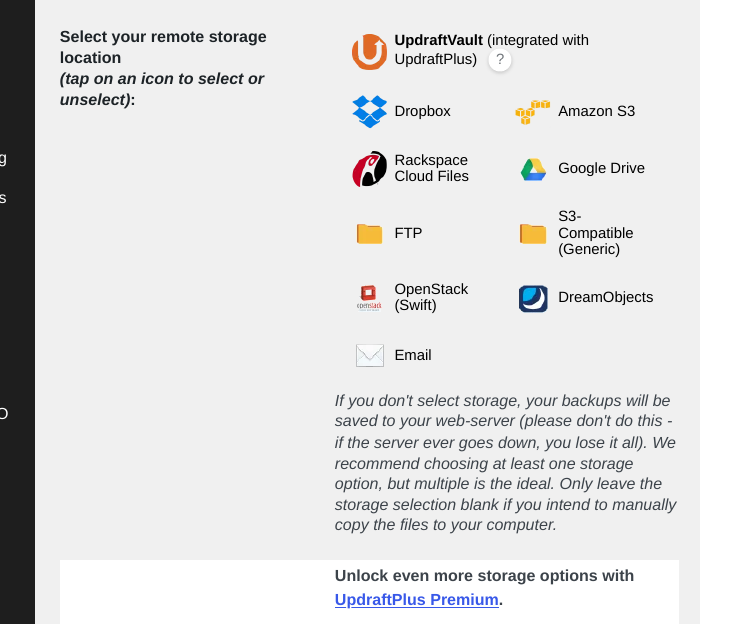
- Scroll to the section called Choose your remote storage. You will see a row of icons: Google Drive, Dropbox, and others.
- Click the Google Drive icon to select it.
- Scroll to the bottom and click Save Changes.
- A message appears asking you to authorise access — that is, to give UpdraftPlus permission to save files in your Google Drive. Follow the prompt: sign in to your Google account, and grant the permission it asks for. You will be sent back to your dashboard with a success message.
- Still on the Settings tab, find the tick-box that sends a short report to your site’s admin email address after each backup, and tick it. This is your early-warning system. A backup that fails quietly is almost as bad as no backup.
- Click Save Changes again.
- Now go back to the Backup / Restore tab and run one more backup with the Backup Now button, exactly as in Step 2. This time, the copy travels to Google Drive as well.
- Open Google Drive in your browser and look for a folder called
updraft. Your backup files should be sitting in it. Seeing them there, with your own eyes, is part of the job — do not skip it.
If you chose Dropbox instead, the steps are the same shape: pick the Dropbox icon, save, sign in to Dropbox when prompted, allow access, save again, and run a backup. If your site is heavy with photos or video, Google Drive’s 15 GB gives you more breathing room.
Step 4: Set an automatic schedule that matches how often your site changes
A backup you run by hand only protects you on the days you remember. So make it automatic.
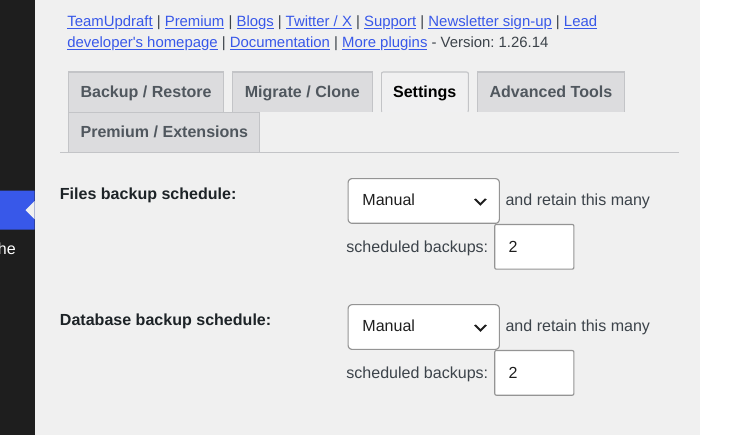
- On the Settings tab, look at the top of the page. You will see two dropdown menus: Files backup schedule and Database backup schedule. Both start on Manual, which means “only when I say so.”
- Next to each dropdown is a box labelled retain this many scheduled backups. Retain means “keep.” This number is how many old backups UpdraftPlus keeps before it deletes the oldest one to make room. It starts at 2. Two is thin. Raise it.
- Set the schedules to match your site:
- Files change slowly. Your theme and plugins only change when you update them or upload new photos. Weekly is right for most sites.
- The database changes every time you publish, take an order, or get a comment. Daily is right for most sites. A busy shop should go more often — every 12 hours, or even more.
- Click Save Changes at the bottom.
Worked example. Maya runs a small online shop. She adds products most weeks and takes orders every day. Her settings: Files backup schedule, Weekly, retain 4 (about a month of file backups). Database backup schedule, Daily, retain 14 (two weeks of daily databases). If a bad update breaks the shop on a Thursday, she can roll back to Wednesday’s database and last week’s files — losing at most one day of orders, not the whole shop. Now flip it: Tom has a hobby blog he updates twice a month. His settings: files Monthly, database Weekly. Same idea, lighter load. The rule is simple: back up as often as you would hate to redo the work.
Two honest notes about the free version. First, the free version picks the time of day itself, based on when you saved the schedule — choosing an exact hour, like 3 a.m., is a paid feature. Second, WordPress runs scheduled jobs when someone visits your site. On a very quiet site, a scheduled backup can sit waiting for a visitor. If your site gets almost no traffic, glance at the Existing Backups list once a week, and run a manual backup if nothing new has appeared.
Step 5: How to RESTORE, step by step
Sooner or later, something will go sideways. An update will misbehave. A change will look awful. You will be glad you are reading this part before that day, because restoring when you are calm takes five minutes, and restoring when you are panicking takes forever.
Before you restore, know this: restoring replaces your current site with the older copy. Anything created after the backup — new posts, new comments, new orders — will be gone. If your site still partly works, take a fresh backup of its current state first, so you have both versions to choose from. Then:
- Go to Settings, then UpdraftPlus Backups, and click the Backup / Restore tab.
- In the Existing Backups section, find the backup from before the problem started. Dates matter more than newness: if the trouble began on Tuesday, restore Monday’s backup, not Tuesday’s. A backup taken after the problem started may contain the problem.
- Click Restore next to that backup.
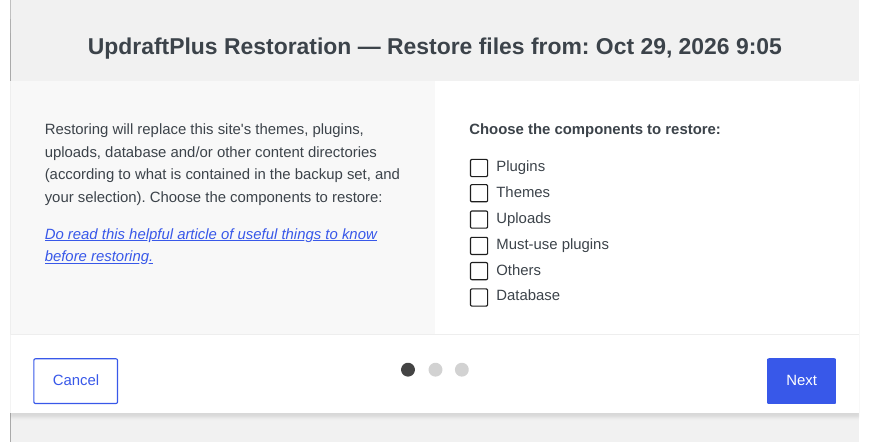
- A window opens, asking which parts to restore. For a full undo, tick them all: Database, Plugins, Themes, Uploads, and Others. (If you know exactly what broke — say, one plugin update — you can restore just the plugins. But when in doubt, restore everything. A half-restore is how strange new problems are born.)
- Click Next.
- UpdraftPlus checks the backup files, then shows you warnings about what is about to happen. Read them. They are short, and they are telling you the truth.
- Click Restore again to confirm.
- Wait for the message that the restore succeeded. Then check your site: open the home page, log in to the dashboard, and click through the pages that matter. If it looks right, you are done. Breathe.
Worked example. It is Tuesday morning. You updated a plugin last night, and now your home page is blank white. You open UpdraftPlus, and there are backups from Sunday and Monday. You pick Monday’s — the last one from before the update. You tick all five parts, click Next, read the warning, click Restore. Three minutes later the home page is back. The plugin is back to its old version too. You can now update it again slowly, one plugin at a time, or leave it alone until its developer fixes the problem. That is the whole superpower: undo.
If you cannot log in at all: do not panic. This still works, it just takes a longer road. Install a fresh copy of WordPress on the same hosting account (your host’s control panel usually has a one-click installer, or ask your host’s support — this is a normal request). Install UpdraftPlus on the fresh site. Connect the same Google Drive or Dropbox account on the Settings tab. On the Backup / Restore tab, click Rescan remote storage — UpdraftPlus will go and fetch the list of your backups from the cloud. Then click Restore next to the backup you want, exactly as above. Your site comes back, and you log in with the username and password from the old site, because the restore brings the old login details with it.
Step 6: The step everyone skips — the two-minute sanity check
A backup you have never checked is a promise, not a fact. Here is how to turn it into a fact, while nothing is on fire:
- Right after your first backup finishes, open the Existing Backups section and check that all five parts are listed — Database, Plugins, Themes, Uploads, Others — and that none of them shows a file size of zero. A zero-size file is a corpse, not a backup.
- Open Google Drive (or Dropbox) and confirm the same files are actually there, in the
updraftfolder. If the cloud folder is empty, the connection is not working, and you want to know that today, not on the worst day of your year. - Read the backup report email when it arrives. It should say the backup completed. If it says it failed, or if it never arrives, something needs fixing — usually the remote storage connection, which you can redo from the Settings tab.
- Repeat this check the first time each month. Thirty seconds, once a month, and you will never be the person who discovers their backup was broken on the day they needed it.
The gold-standard test is restoring a backup onto a spare copy of your site — many hosts offer a staging site for this, a private practice copy where you can try things safely. If your host offers one, restore there once, just to watch it work. If your host does not, steps 1 to 3 above still catch the failures that matter most: backups that never ran, backups that never left the server, and backups with pieces missing.
4. Common mistakes
| Mistake | Why it hurts |
|---|---|
| Backing up the database only. | You keep your words and lose your design, your plugins, and your photos. A backup needs files and database. |
| The only copy lives on the same server it protects. | If the server goes down or the account is hacked, your backup goes with it. A copy off the server — Google Drive, Dropbox — is the whole point. |
| Never testing a restore. | A backup that has never been checked is a guess. Check the parts, check the cloud folder, read the report email. Two minutes, once a month. |
| Backing up AFTER making the changes. | A backup taken after the damage is a photograph of the damage. Back up before you update, edit, or experiment. That is why this tutorial is called “before you touch anything.” |
5. Step zero, from now on
From here, the rule is simple: backup first, then touch. Every update, every redesign, every “quick change” that is never actually quick. The crew that looks after Locker Forge works the same way — a backup is step zero of every job, before a single thing changes.
And if you would rather not touch any of this yourself, the crew can set it up for you — the kind of quiet job that is easy to hand to someone else, and hard to regret.
Now go and run your first backup. Your future self — the one staring at a blank white page at midnight — says thank you.
UpdraftPlus version checked: 1.26.14 (free version), released 26 October 2026. Menu and button labels in this tutorial are the labels in that version. If your screen looks slightly different, you are probably on a newer version — the steps follow the same shape.